
Showing posts with label A little bit of baking. Show all posts
Showing posts with label A little bit of baking. Show all posts
30 Jan 2014
Bak Kwa Madness for coming Chinese New Year??
Chinese New Year is justwith my friend since the start of January.
I came across an article on New Paper - 'Behind the scenes in a bak kwa shop' which featured Lim Chee
Guan. There was even a video to give public a peek at its HQ at Pandan Loop. Obviously the secret recipe
was not included in this article.
My eyes almost popped out of my socket when I saw that 1kg of Bak Kwa was going for $50.00 at the
shop! Gosh! Those people have been queuing for hours too and they mentioned that it was worth the wait.
Is it a tradition that Chinese New Year means Bak Kwa time?
The link of the article can be found here.
Another article which I came across last Monday with the heading
HED CHEF EXTRA: How to make your own bak kwa
HED CHEF EXTRA: How to make your own bak kwa
sparked my interest.
The recipe given was:
-1kg minced pork (shoulder butt)
-220g fine sugar
-1½ tsp salt
-1 tsp light soya sauce
-1 tbsp oyster sauce
-½ tsp five spice powder
-1½ tbsp Chinese rice wine
-Pinch of red food colouring powder
I guessed many people who tried making it would be greatly disappointed as it would never turn out the
same as those commercialized outlets like Lim Chee Guan, Bee Cheng Hiang or Fragrance Bak Kwa.
The reason of me writing this post was because I was a bit pissed off. I have already tried making Bak Kwa
even before this article's recipe was published, using the oven, even with barbecuing, and the results was so off! It could be found on my previous post here. Not to mention the texture was not right too...
Notice the article's recipe above contained sugar as the main sweetening agent? My friend and I did a batch
with only sugar and no honey (the recipe I used have), the taste turned out really flat! Honey not only
sweetened the Bak Kwa but also provides flavor. (Different brand, different flower, different flavor also.)
Be careful as honey is sweeter than sugar too.
Another thing that would happen when you place the marinated meat into the oven would be the oozing out
of marination which I experienced many times before. To prevent that from happening, I suggested using the
dehydrator which I did not expect my friend to actually buy it
 |
| The same dehydrator that could be used to make fruit and vegetable chips! It cost my friend about $250. Basically he dehydrated the marinated meat for about an hour, about 65 degrees (high). (Also have low and medium heat options.) |
 |
| After that, the marinated meat is smoked with his own-made smoker, made from a 3 tier Ikea rack, covered by some board used for artwork. (Sushi bamboo racks to place the marinated meat on.) |
 |
| (Top view) An opening for smoke to escape and and thermometer to determine the temperature of the smoking. |
 |
| Just a tin with hickory wood/charcoal to produce the smoke. |
 |
| Final outcome of the Bak Kwa! Do not use hickory wood but stick to charcoal instead as the smokey flavor was overwhelming. It made the Bak Kwa taste like Lap Cheong (Chinese sausages) instead. The Bak Kwa was also like a sponge, absorbing all the moisture from my mouth, making it dry. Almost there!!!! |
(Everything stated is based on personal opinion ; open to suggestions and advice)
4 Jan 2014
Homemade meat jerky! Bak Kwa experiment for Chinese New Year!
My very 1st post for the year 2014 and I will be blogging about my homemade meat jerky process! I still
have a couple of 2013 posts which I have yet to update but this post was the priority since Chinese New
Year is approaching! My 3rd time experimenting with the seasoning quantity before finally settling with the
one below. (Note: Adjusted based on my personal preference!)
have a couple of 2013 posts which I have yet to update but this post was the priority since Chinese New
Year is approaching! My 3rd time experimenting with the seasoning quantity before finally settling with the
one below. (Note: Adjusted based on my personal preference!)
The recipe I modified into:
Pork 300g (A bit fattier would be better)
Sugar 3 tbs
Honey 3 tbs (I think malt syrup would be better, more caramelised flavor.)
Fish Sauce 1.5 tbs
Sweet Wine 2 tbs (I used a dessert wine)
Dark Soy Sauce 1/2 tbs
Char Siew Sauce 1 tbs (Removed after 3rd batch)
Five Spice 1/2 tbs
Sesame Oil 1/2 tbs (Removed after 3rd batch)
If anyone knows of any better tried-and-tested-before recipe, care to share with me so I could try?
I knew it would not be so easy to get close to the exact taste of Bak Kwa, if not everyone would be making
their own already.
 |
| The recipe would be for 300g of meat and I did X2 the recipe for 600g of marinated minced pork, beef and chicken. Best if you could add more fats into your minced meat as mine were all too lean! After marinating the meat overnight in the chiller, the minced chicken was a bit watery while minced beef was still rather firm. Pork was always in-between. |
 |
| I started off by portioning the meat into 100g - 110g so that all the jerky would be about the same size. (Too large piece would be difficult to flip over and would easily break apart.) I spread the minced meat onto an aluminium sheet, place a cling wrap over and using a rolling pin, flatten the meat evenly. About 2mm thickness for mine. |
 |
| After spreading evenly on the aluminium, either you could directly bbq the meat or place it into the oven to bake fully. I did half-half. About 200 degrees in the oven for 10-15 mins to firm up the meat before transferring to the BBQ pit to barbecue! I guessed that it was normal for the marination to leak out of the marinated meat during the baking process? Any ideas? |
 |
| Picture of myself barbecuing the meat jerky! |
 |
| Another selfie shot with my friend's barbecue pit! Thanks Glenn for letting me use his house to barbecue! |
 |
| The texture was way too smooth to be Bak Kwa and it looked more like ham instead. |
 |
| My friend did the baking to firm up the minced meat before I barbecued them. Kept flipping and barbecuing piece by piece as his oven could only bake a piece at a time. |
 |
| Glazed with honey when the meat was about to be done with a bit of charred parts appearing. Make sure the honey dries slightly or it would end up sticky. |
 |
| Done! Pork or beef ?? |
 |
| Another shot with only 2 pieces... |
 |
| Some of the minced chicken ended up like this, all broken apart because it was too soft to flip with tongs. |
 |
| Done with all the 1.2kg of beef and pork which took about 5 hours...? |
Final conclusion:
Beef - Jerky have quite a strong beefy taste and smell which could be quite unpleasant.
The meat was rather firm but soft and tender.
Easy to handle while baking and barbecuing.
Easiest to dry up and discolour after a few days in the fridge
Chicken - Became watery/mushy after marination and broke apart easily.
Tasted a bit like satay / chicken steak.
Pork - Texture a bit rubbery after a few days in the fridge.
More suitable due to having more fats (although mine still not enough)
All - Unusual smell and taste, something like hoisin sauce detected.
The texture too smooth to be Bak Kwa.
Overall taste still negative to me.
5 Dec 2013
Experiment : Choux with Salted Yolk Custard
 |
| Just a quick post of my choux pastry I did quite some time ago! I decided to experiment with salted egg yolk to incorporate into my custard cream to mimic the all-time popular 'liu sa bao' found in Chinese restaurants serving Dim Sum. Baked some really nice looking oblong shaped choux pastry to hold the custard cream. |
 |
| The standard custard cream recipe with salted egg yolk! I actually bought 4 salted eggs but ended up using only 2. You know why? 2 were bad, I dam 'sway' right? Visible bits of salted egg yolk in there. I should have boiled the eggs before using the food processor to blend them into paste, prior to adding into my custard cream. My bad. |
 |
| My yummy looking eclairs with salted yolk custard cream! I may want to experiment and modify the recipe next time when I have the time... |
18 Nov 2013
My Term 4 Plated Dessert Exam
 |
| My Term 4 has passed, and my exam that term was to create a plated dessert with 1 main component and 3 or more sub components. Total time taken was about 10 hours which was split into 2 days. The theme of my dessert is Fossil! Just a brief about my components below and I tried not to 'advertise' my own creation so much... |
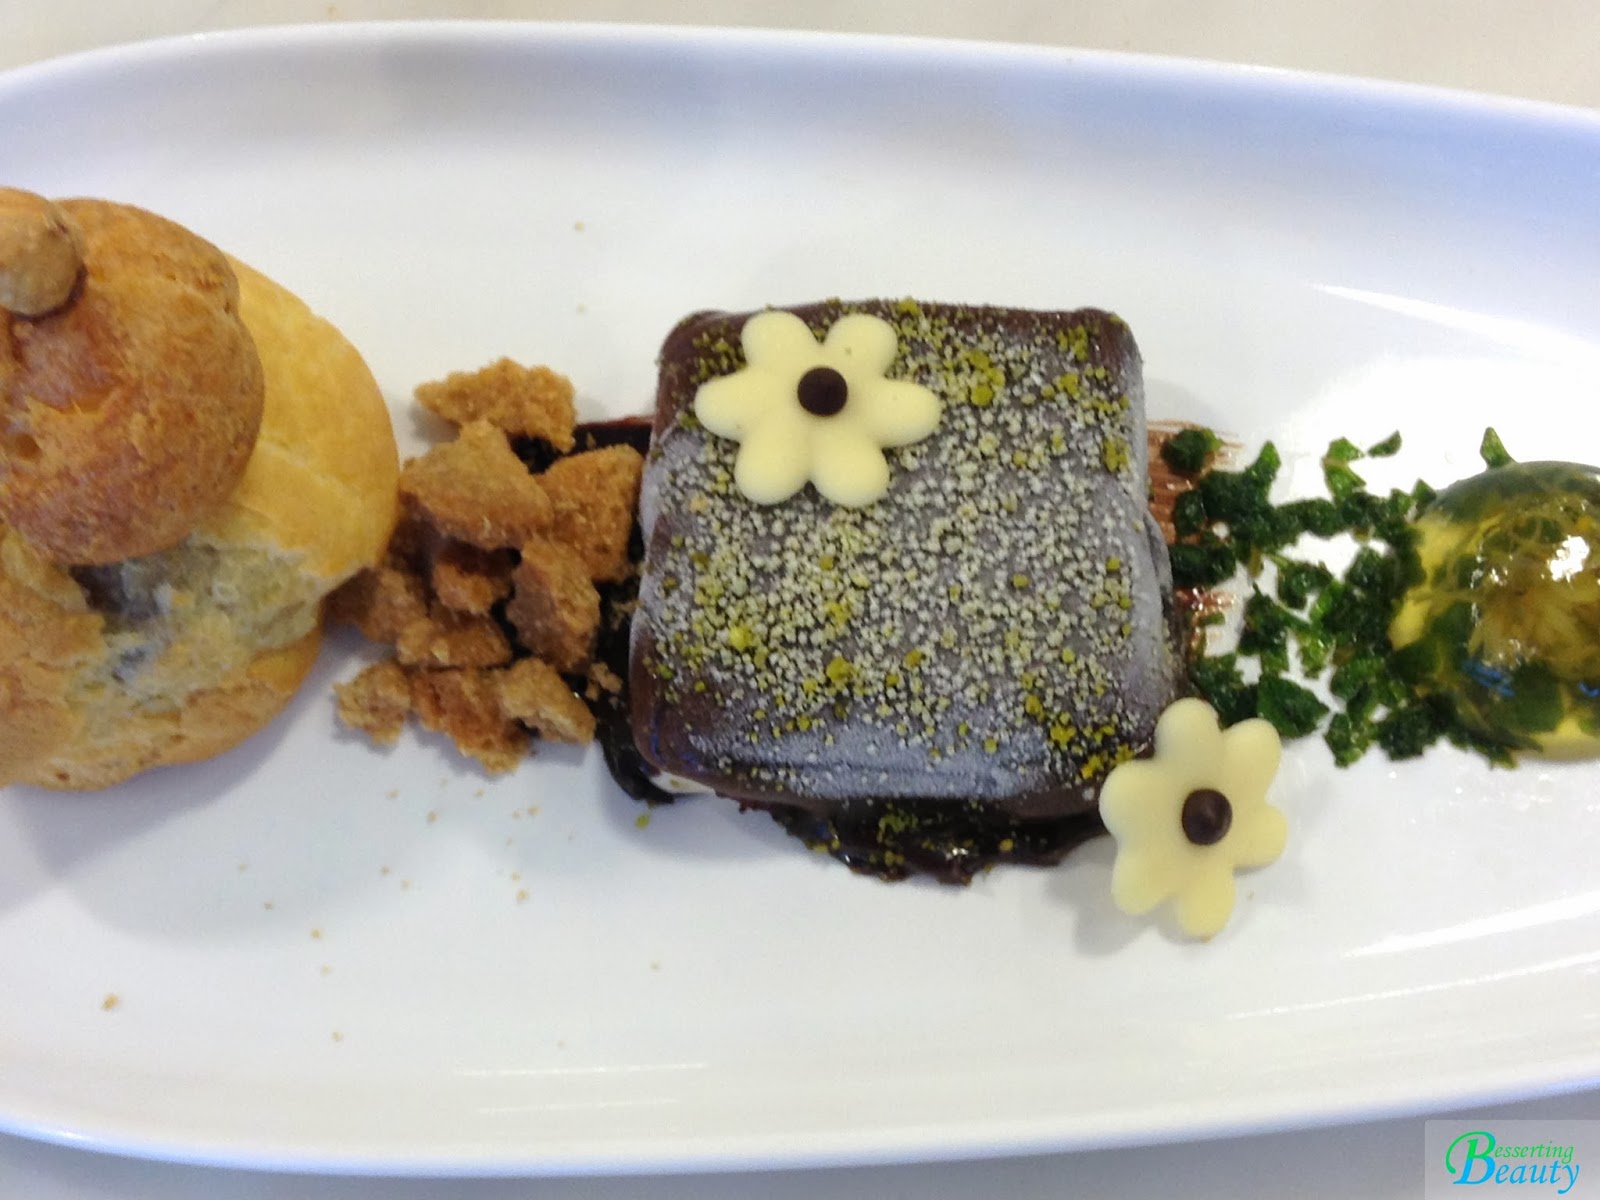 |
| Banoffee Ice cream (banana + toffee with digestive biscuits for extra crunch) coated with silky chocolate glaze, giving a gooey texture as the ice cream melted within. |
 |
| One of the criteria was to plate 4 plates of similar dessert and here's my picture of 2! |
 |
| My small choux filling was salted custard cream while my big choux was salted hazelnut ganache. |
 |
| My osmanthus Jelly which I loved so much! Beautiful yellowish transparency with the flower and petals encased within. Those mint leaves gave extra minty flavor as well as colour! |
6 Nov 2013
Baking with friends!
 |
| This post was actually more than a month back and it was still under my draft session! It was quite a random thing as 3 other of my poly friends wanted to bake a rainbow muffin. All the 'mise en place' we had placed on the table for a little photo. |
 |
| Our rainbow muffin consisted of 5 colours and look at those lovely pastels. Luckily I told them to control from adding too much colours as it would look too artificial, unless natural coloring were used. |
 |
| We also made green tea cubcakes with green tea kit kats stuck into them. Our whipped cream actually failed, making our cupcakes looking under dressed. However, the green tea taste was still so awesome! |
 |
| Our mini plain vanilla cupcakes with a coffee chocolate bean. Our alcohol had evaporated in the oven.... Opps!!! |
 |
| Our rainbow cupcake! Too bad the 1st batch was too overflowing and the batter flooded out while in the oven, resulting in a rainbow smudging mess. This was the 2nd batch and I could only detect 3 colors?? Anyway, we had a really fun but tiring time and the pictures we took turned out quite unglam (so not posting them!). |
27 Jul 2013
My 1st Bread Showpiece 'Crash Site'
 |
| My very first bread showpiece I did in school 2 days ago! The decoration bread dough, also known as dead dough is definitely not edible. I came out with this concept of 'Crash Site' only on the spot without prior planning, and the crafting space was about palm size. |
 |
| I felt like I was back during my primary school days modelling clay into miniature figurines for art lessons. I really enjoy art and sculpturing, making the best out of the 2 hours and less given time to complete my masterpiece. Roof meshing, fallen pillar, collapsed brick wall, debris and a un-detonated missile (I know it doesn't looked like one). |
 |
| Another view of the meshing! It was really tricky to do those netting design due to the crumbly bread dough and interloping dough of about 4 mm in diameter. |
The recipe that I used:
Baking temperature about 170 degrees, Time about 1/2 hour.
400g Plain Flour
70g Rye Flour
30g Potato Starch
30g Salt
100g Soften Butter
Sugar Syrup:
80g Water
120g Sugar
Steps:
1) Mix all the ingredients together
2) Add soften butter
3) Add sugar syrup (not too hot)
4) Mix to form a smooth, firm dough (add more syrup if needed)
5) Let dough rest overnight in chiller
The next day, add some sugar syrup to soften dough, blend well and enjoy making your bread showpiece!
14 Jun 2013
Mixed Berry Bar with Sour Apple Sauce - Randomness
 |
| Yesterday was my bake for health exam and 19 of us (my class) had to create our own healthy recipe. It was really challenging and fun at the same time as we could freely express our creativity, exploring into our own choice of either to create a baked or chilled dessert. My lousy phone camera did not show much justice to my dessert, not that my dessert looked picture pretty anyway. It was my first time making this mixed berry bar which I got the recipe from Clean Eating magazine (and I am using it for exam!). I customised and adjusted the recipe based on nutritional value of an individual serving. Made with whole wheat flour and rolled oats that has high fibre, it gave the bar a slightly dense and chewy texture. The dried blueberries, dried apricots and dried wolfberries added a punch of vitamins, minerals as well as antioxidant. The eggs (mainly egg white), some apple sauce and honey acts as a binder as well as natural flavouring. Silvered almonds was for added crunch too. Basically like an all-in-one food that is low fat, low cholesterol and extremely high energy! My applesauce is made by stewing apples with apple cider and a pinch of cinnamon. I found such a cute little pot to place my sour dip in, and to compliment the unappetising bite-size bars that is eaten with a toothpick. |
5 May 2013
Ladyfingers and Tiramisu!
 |
| A couple of weeks ago I decided to prepare some tiramisu since my brother have a lovely bottle of Cafe Boheme standing stagnant in the refrigerator. Cafe Beheme is actually a coffee flavored alcohol which make a perfect refresher after adding a couple of ice cubes. I bet coffee and alcohol lovers would want to try it! Anyway, I baked some ladyfingers sponge first from the recipe below: 4 egg whites 78g caster sugar (A) 15g caster sugar (B) 3 egg yolks 60g cake flour
1) Egg whites and sugar (A) for meringue (Whisk till glossy and firm peak)
2) Egg yolk and sugar (B) (Well blend)
3) Fold egg yolk mixture into meringue (Gently)
4) Fold in cake flour (Gently)
5) Pipe into fingers and bake at about 180 degrees for 12 to 15 minutes
|
 |
| As for the tiramisu, I used 750g of mascarpone cheese which was a bit too much (I think 500g would do fine in future). I mixed coffee powder with the Cafe Boheme alcohol to increase the coffee flavor and then dipped the ladyfingers into the mixture. Lay the ladyfingers in any container/bowl, spread a layer of Cafe Boheme infused mascarpone on top and sieve an even coating of cocoa powder. (I repeated the process twice for more layers.) The above was about 8 servings size, so chill it and enjoy! I also want to thank my friends for the positive feedback!! |
7 Apr 2013
Custard Puffs
 |
| I decided to bake some choux pastry some time ago, hoping that my lousy oven would not fail me. These were unfilled puffs which I manged to bake and they were hollow and light. A couple of them did not raise well while 95% was enough to delight me. As for the filling, I was still deciding whether to fill them with pastry cream or custard. |
 |
| I made the custard cream the following day, and it turned out rather rich and had a creamy consistency. I felt that it was a little bit on the sweeter note that could easily be corrected next time. I was rather lucky that the amount of custard made was sufficient to pipe all the puffs. Sharing these little puffs with my family and friends was the best past of baking as they enjoyed biting into them, allowing the custard to ooze out slightly while savoring the sweetness that linger in their mouth. |
7 Feb 2013
Pineapple Tarts
 |
| Chinese New Year is just around the corner and nothing excites me more than collecting 'hong baos' (Red packets with notes inside)! I have seen many bombardment of pineapple tart recipes of different variation appearing in many baking blog posts and I was tempted to just follow the crowd. I am considered a baker anyway, a newbie one to be exact. I searched the web randomly and landed on a blog called foodismylifeand here is the link of the recipe which I had followed. It was my first attempt baking pineapple tarts and it was a success. The recipe as follows: 500g pineapple fillings (I used Poon Huat's) 400g plain flour 1/4 tsp salt 2 tbs corn flour 63g icing sugar 250g unsalted butter (room temperature) 2 no.s egg yolks (40g) + 1 no. egg yolk (egg wash) 1 pcs of pineapple tart has 6g filling and 11g dough Total amount of pineapple tarts I made: 67 pcs Oven temperature: 200 Degrees Duration: About 15 mins Soft, crumbly, melt-in-the-mouth, buttery, fragrant, a bit sweet, proportion just right. |
31 Dec 2012
Orange Chiffon Cake
 |
| An orange chiffon cake I baked before my term 1 exams! It was like almost a month back and I finally made the effort to post this up! It did not seems to raise enough but still, the chiffon was soft and spongy while the orangey flavor was rather prominent as I juiced an entire large orange. I admit that this was my second attempt because I screwed up in my first attempt. I folded in my meringue into the dry ingredients and realised that my bowl of wet ingredients was still sitting patiently on the other side of my table. Wth right? A really dumb mistake that caused me to waste my ingredients and effort! Let this post be the last for the year 2012 as in a couple of hours time, it would be a brand New Year of 1013! My blog will once again change its focus and new goals awaits me! |
28 Oct 2012
Vienna Cookies (Sable)
 |
| My first practical test in school had finally passed last week and a part of it was to bake these Vienna Cookies (Sable)! Sable is French for ''sand'', which refer to the sandy texture of these delicate cookies. I have been practising to make these cookies at home as I needed to get used to making them. The shape was not supposed to be that way as I gave them additional loop (I only realised that after my test! Noooo....). I made 4 batches in total, 2 batches were vanilla (original) and I experimented with cocoa and milo version too. |
 |
| The Original Cookies freshly taken out of my oven! My practical test was on a Wednesday and I started practising baking these cookies on the previous Fri, Sat, Sun and Tue which was the day before my test! So hardworking right? |
 |
| The size affected the baking timing and I tried to standardise all the sizes to be as similar as possible. About 180 degrees for 12 to 15 minutes. |
 |
| This batch was the one I tried with 50g of cocoa powder. I felt that 50g was a bit too much as although it had a really strong dark chocolaty taste, it was slightly bitter. (If adding cocoa powder, you would need to replace the flour with it.) |
 |
| This batch was with milo powder. Next time I need to reduce the amount of icing sugar used as milo powder was already sweetened in the first place. The taste was not that off anyway. Another thing to take note was that milo powder cloyed rather easily and quickly when left exposed. It was difficult to mix once they cloyed and they ended up showing up as little lumps within my cookies. Take them as 'chips'! |
 |
| I also tried sticking in glazed mocha beans (chocolate) into some of my milo cookies. They definitely boost the taste, making the cookies more flavorful. The beans melted slightly when being placed in the oven though. |
The recipe that I followed:
30g egg white (1 egg)
200g unsalted butter
225g cake flour
75g icing sugar
26 Oct 2012
Challah Bread
 |
| Challah Bread is a Jewish braided bread eaten on Sabbath and on holidays. It was the 1st bread which I leaned and baked, and it was done in school! It was a challenge for me to braid the bread as I got rather confused with the 3 layers, not knowing which over which. Not my fault as I do not have long hair which many girls do to practise with. Anyway, I took sometime before figuring that out. |
 |
| This was after baking to a golden brown and the bread were left to continue its carry over baking process. |
 |
| White sesame seeds were normally sprinkled on Challah Bread and sometimes raisins can be added too. The photos were taken from my course mate Hinna's camera. |